In this tutorial we will show you a recommended configuration for OpenFaaS Functions for Karpenter on AWS EKS.
We’ll start by deploying OpenFaaS to AWS EKS, then we’ll set up Karpenter for cluster autoscaling. When you autoscale both your functions and your Kubernetes nodes, then you can keep costs down to an absolute minimum. There are some trade-offs to this approach, so we’ll cover that along the way.
The cluster will be split in static and dynamic capacity. The OpenFaaS core components will be running on static nodes in an EKS Managed Node Group. Then, Karpenter will be used to add, remove and resize nodes in the cluster based on the load observed on your functions.
What is Karpenter?
Karpenter is an open-source Kubernetes cluster autoscaler originally created for use with AWS EKS. It automates the provisioning and deprovisioning of nodes based on the scheduling needs of Pods, allowing efficient scaling and cost optimization.
Compared to other alternatives like Amazon EC2 Auto Scaling Groups and the Kubernetes Cluster Autoscaler (CAS), Karpenter has some differences.
- It’s specialised primarily for use with AWS, and has some experimental support for Azure.
- Is a modern, purpose built autoscaler that not only adds and removes nodes like the other two solutions, but tries to optimise for density, by replacing smaller nodes with larger ones when possible.
- Has a built-in concept of “NodePools” which can be used to group nodes together and apply different constraints to them. This can be used to run different workloads on different types of nodes.
- Has a tight integration with Kubernetes through its own Custom Resources Definitions (CRDs) and controllers.
- Comes with insights on cost, performance, utilisation through its own set of Grafana dashboards and metrics
Karpenter is a good fit for OpenFaaS because it can be used to scale the cluster based on the load of the functions. This can be used to save costs by removing nodes when functions are not used and adding nodes when functions are scaled up. Karpenter can also be used to run functions on different types of nodes based on their requirements such as whether they should run on spot instances, on-demand instances or on nodes with GPU resources.
In a future article, we’ll show you how to combine everything we’ve covered here with scale to zero GPUs, for use with functions that require GPU resources like Large Language Models (LLMs) or audio transcription.
What makes Karpenter a good match for OpenFaaS?
Improved scalability
Karpenter will provision and deprovision nodes automatically based upon real-time workload requirements to ensure there is enough capacity in the cluster. It can increase the size of the cluster when more functions are deployed or when a function has high demand and is scaled up by the OpenFaaS autoscaler.
Cost optimization
- Make use of spot instances - Karpenter can use spot instances to reduce cost for workloads that tolerate interruptions It can easily blend them with on-demand instances to ensure each workload runs on the right type of instance.
- Right sized nodes - Nodes are automatically provisioned with optimal resources to match workload demands and avoid over-provisioning.
- Combining workloads onto fewer nodes. Pods are moved to different nodes and packed together if workload demands change, allowing Karpenter to remove unused nodes.
Operational simplicity
Karpenter simplifies node management. Scaling a Kubernetes cluster often requires pre-configured node groups, scaling rules or manually adding nodes. Karpenter eliminates this by dynamically selecting the right instance types and adding them to the cluster based on a flexible NodePool configuration. Unlike node group-level autoscalers, Karpenter makes scaling decisions based on the entire cluster’s needs.
How to Deploy OpenFaaS and Karpenter on AWS EKS
In the following sections we will run you through the steps to get a basic OpenFaaS deployment with Karpenter running on EKS.
eksctl is used to create a new EKS cluster. If you have an existing EKS cluster or are switching from Kubernetes Cluster Autoscaler we recommend you to take a look at the Karpenter Migration guide for the Initial installation of Karpenter.
Prerequisites
Tools that need te be installed on your system to follow along with this guide. Most of these are available in arkade, which is an easy way to install common CLIs for developers.
- AWS CLI
- eksctl, CLI for AWS EKS -
arkade get eksctl - kubectl -
arkade get kubectl - Helm -
arkade get helm
Create an AWS EKS cluster
The instructions are based on the Karpenter gettings started guide. You can check out this guide for a more in depth overview of how to get started with Karpenter.
Env variables
Set the Karpenter and Kubernetes versions:
export KARPENTER_NAMESPACE="kube-system"
export KARPENTER_VERSION="1.1.1"
export K8S_VERSION="1.31"
Set the cluster name, region and account id:
export CLUSTER_NAME="openfaas"
export AWS_PARTITION="aws"
export AWS_DEFAULT_REGION="us-east-1"
export AWS_ACCOUNT_ID="$(aws sts get-caller-identity --query Account --output text)"
export TEMPOUT="$(mktemp)"
Create infrastructure dependencies for Karpenter
Karpenter requires IAM permissions to provision nodes and SQS for interruption notifications. Use Cloudformation to set up infrastructure needed by the Karpenter. See the Karpenter CloudFormation reference for a complete description of what cloudformation.yaml does.
curl -fsSL https://raw.githubusercontent.com/aws/karpenter-provider-aws/v"${KARPENTER_VERSION}"/website/content/en/preview/getting-started/getting-started-with-karpenter/cloudformation.yaml  > "${TEMPOUT}" \
&& aws cloudformation deploy \
  --stack-name "Karpenter-${CLUSTER_NAME}" \
  --template-file "${TEMPOUT}" \
  --capabilities CAPABILITY_NAMED_IAM \
  --parameter-overrides "ClusterName=${CLUSTER_NAME}"
Create the cluster
We will be creating a cluster with only a single static node in this demo. For production clusters it is recommended to run more than one node in the system node group. The Karpenter Helm chart for example tries to deploy 2 replicas of its controller to different nodes by default, OpenFaaS recommends running 3 replicas of some components. For production it is recommended to run at least 2 nodes or more.
Create a cluster config that can be used with eksctl.
With this config eksctl will:
- Create a Kubernetes service account and AWS IAM Role, and associate them using IAM Roles for Service Accounts(IRSA) to let Karpenter launch instances.
- Add the Karpenter node role to the aws-auth configmap to allow nodes to connect.
- Create an AWS EKS managed node group for the kube-system, karpenter and openfaas namespaces.
cat > clusterconfig.yaml <<EOF
---
apiVersion: eksctl.io/v1alpha5
kind: ClusterConfig
metadata:
  name: ${CLUSTER_NAME}
  region: ${AWS_DEFAULT_REGION}
  version: "${K8S_VERSION}"
  tags:
    karpenter.sh/discovery: ${CLUSTER_NAME}

iam:
  withOIDC: true
  podIdentityAssociations:
  - namespace: "${KARPENTER_NAMESPACE}"
    serviceAccountName: karpenter
    roleName: ${CLUSTER_NAME}-karpenter
    permissionPolicyARNs:
    - arn:${AWS_PARTITION}:iam::${AWS_ACCOUNT_ID}:policy/KarpenterControllerPolicy-${CLUSTER_NAME}

iamIdentityMappings:
- arn: "arn:${AWS_PARTITION}:iam::${AWS_ACCOUNT_ID}:role/KarpenterNodeRole-${CLUSTER_NAME}"
  username: system:node:{{EC2PrivateDNSName}}
  groups:
  - system:bootstrappers
  - system:nodes
  ## If you intend to run Windows workloads, the kube-proxy group should be specified.
  # For more information, see https://github.com/aws/karpenter/issues/5099.
  # - eks:kube-proxy-windows

managedNodeGroups:
- instanceType: m5.large
  amiFamily: AmazonLinux2
  name: ${CLUSTER_NAME}-ng
  desiredCapacity: 1
  minSize: 1
  maxSize: 4

addons:
- name: eks-pod-identity-agent
EOF
Create a new EKS cluster using the cluster configuration:
eksctl create cluster -f clusterconfig.yaml
Create a role on AWS to allow access to spot instances.
Unless your AWS account has already onboarded to EC2 Spot, you will need to create the service linked role to avoid the
ServiceLinkedRoleCreationNotPermittederror.
aws iam create-service-linked-role --aws-service-name spot.amazonaws.com || true
# If the role has already been successfully created, you will see:
# An error occurred (InvalidInput) when calling the CreateServiceLinkedRole operation: Service role name AWSServiceRoleForEC2Spot has been taken in this account, please try a different suffix.
Deploy Karpenter
Create a Helm configuration file, karpenter-values.yaml, for Karpenter:
cat > karpenter-values.yaml <<EOF
# Run a single replica, if your cluster has more static nodes this value
# can be increased.
replicas: 1

settings:
  clusterName: ${CLUSTER_NAME}
  interruptionQueue: ${CLUSTER_NAME}

resources:
  requests:
    cpu: 0.5
    memory: 512Mi
  limits:
    cpu: 1
    memory: 1Gi
EOF
We halved the cpu and memory requests to reduce the number of nodes required for this demo. If you deploy Karpenter in production it is recommended to increase these requests.
Deploy Karpenter with Helm:
# Logout of helm registry to perform an unauthenticated pull against the public ECR
helm registry logout public.ecr.aws

helm upgrade --install karpenter \
    oci://public.ecr.aws/karpenter/karpenter \
    --version "${KARPENTER_VERSION}" \
    --namespace "${KARPENTER_NAMESPACE}" \
    --create-namespace \
    -f karpenter-values.yaml \
    --wait
Deploy OpenFaaS Standard
We are going to use OpenFaaS Standard here, however the instructions are the same for OpenFaaS for Enterprises.
Detailed installation instructions including the various chart configuration options are available in the OpenFaaS docs and Helm chart.
For the OpenFaaS configuration we start from the recommended configuration, then add a nodeAffinity rule. The nodeAffinity will make any Pods needed for the OpenFaaS core components run on AWS managed nodes, for stability. Whilst the control-plane can run in High Availability (HA), and tolerate node disruption, it’s recommended to run the core components on static nodes.
affinity:
  nodeAffinity:
    requiredDuringSchedulingIgnoredDuringExecution:
      nodeSelectorTerms:
        - matchExpressions:
            - key: karpenter.sh/nodepool
              operator: DoesNotExist
The rule makes sure that the components will not run on nodes managed by Karpenter. We detect this by looking for the absence of the karpenter.sh/nodepool label.
Create a openfaas-values.yaml file with the following content:
cat > openfaas-values.yaml <<EOF
openfaasPro: true
clusterRole: true

operator:
  create: true
  leaderElection:
    enabled: true

gateway:
  replicas: 1

  # 10 minute timeout
  upstreamTimeout: 10m
  writeTimeout: 10m2s
  readTimeout: 10m2s

autoscaler:
  enabled: true

dashboard:
  enabled: true

queueWorker:
  replicas: 1

queueWorkerPro:
  maxInflight: 50

queueMode: jetstream

nats:
  streamReplication: 1

affinity:
  nodeAffinity:
    requiredDuringSchedulingIgnoredDuringExecution:
      nodeSelectorTerms:
        - matchExpressions:
            - key: karpenter.sh/nodepool
              operator: DoesNotExist
EOF
We’ve also set the replica count for the queueWorker and gateway to 1, instead of their defaults to make everything fit into a single node for the purposes of the demo.
Create the namespaces for the OpenFaaS core components, and one for the functions:
kubectl apply -f https://raw.githubusercontent.com/openfaas/faas-netes/master/namespaces.yml
You will now have the openfaas and openfaas-fn namespaces.
Create a secret for your OpenFaaS license:
kubectl create secret generic \
  -n openfaas \
  openfaas-license \
  --from-file license=$HOME/.openfaas/LICENSE
Deploy OpenFaaS using the Helm chart:
helm repo add openfaas https://openfaas.github.io/faas-netes/
helm repo update

helm upgrade openfaas \
  --install openfaas/openfaas \
  --namespace openfaas \
  --values=openfaas-values.yaml
Verify the installation
Once all the services are up and running, log into the gateway using the OpenFaaS CLI faas-cli.
Usually, the OpenFaaS gateway is exposed over HTTPS using a LoadBalancer service, but for the purposes of the demo, we are going to keep the gateway service as a ClusterIP, so it’s private and hidden. You can use kubectl port-forward to access the gateway:
kubectl port-forward -n openfaas svc/gateway 8080:8080 &
Log in with the CLI and check connectivity:
PASSWORD=$(kubectl get secret -n openfaas basic-auth -o jsonpath="{.data.basic-auth-password}" | base64 --decode; echo)

echo -n $PASSWORD | faas-cli login -u admin --password-stdin
faas-cli version
Create a Karpenter NodePool
Karpenter only starts creating nodes when there is at least one NodePool configured using the NodePool CRD. A NodePool sets constraints on the nodes that can be created and the Pods that can run on those nodes. Karpenter makes scheduling and provisioning decisions based on Pod attributes such as labels and affinity. A single Karpenter NodePool is capable of handling many different Pod shapes.
We will create default NodePool and NodeClass Custom Resources that are capable of handling function Pods and any other Pods deployed to the cluster.
Create a NodeClass
Node Classes enable configuration of AWS specific settings like the AMIs for Karpenter to use when provisioning nodes. Each NodePool must reference an EC2NodeClass using the spec.template.spec.nodeClassRef field in the spec.
export ARM_AMI_ID="$(aws ssm get-parameter --name /aws/service/eks/optimized-ami/${K8S_VERSION}/amazon-linux-2-arm64/recommended/image_id --query Parameter.Value --output text)"
export AMD_AMI_ID="$(aws ssm get-parameter --name /aws/service/eks/optimized-ami/${K8S_VERSION}/amazon-linux-2/recommended/image_id --query Parameter.Value --output text)"

cat > default-nodeclass.yaml << EOF
apiVersion: karpenter.k8s.aws/v1
kind: EC2NodeClass
metadata:
  name: default
spec:
  amiFamily: AL2 # Amazon Linux 2
  role: "KarpenterNodeRole-${CLUSTER_NAME}" # replace with your cluster name
  subnetSelectorTerms:
    - tags:
        karpenter.sh/discovery: "${CLUSTER_NAME}" # replace with your cluster name
  securityGroupSelectorTerms:
    - tags:
        karpenter.sh/discovery: "${CLUSTER_NAME}" # replace with your cluster name
  amiSelectorTerms:
    - id: "${ARM_AMI_ID}"
    - id: "${AMD_AMI_ID}"
EOF
Review the Karpenter NodeClass documentation for more information.
Create a NodePool
cat > default-nodepool.yaml <<EOF
apiVersion: karpenter.sh/v1
kind: NodePool
metadata:
  name: default
spec:
  template:
    spec:
      requirements:
        - key: kubernetes.io/arch
          operator: In
          values: ["amd64"]
        - key: kubernetes.io/os
          operator: In
          values: ["linux"]
        - key: karpenter.sh/capacity-type
          operator: In
          values: ["on-demand"]
        - key: karpenter.k8s.aws/instance-category
          operator: In
          values: ["c", "m", "r"]
        - key: karpenter.k8s.aws/instance-generation
          operator: Gt
          values: ["2"]
      nodeClassRef:
        group: karpenter.k8s.aws
        kind: EC2NodeClass
        name: default
      expireAfter: 720h # 30 * 24h = 720h
  limits:
    cpu: 100
  disruption:
    consolidationPolicy: WhenEmptyOrUnderutilized
    consolidateAfter: 1m
EOF
- The
spec.template.spec.requirementsblock is used to define constraints for the type of nodes that can be created. For the default pool we restrict Karpenter to only consider a set of on-demand general purpose instances suitable for most function workloads. - The
limitsblock limits capacity to 100 CPUs. This means the NodePool will stop adding nodes to the cluster when the sum of all capacity created has reached this limit. - The
disruptionblock configures how Karpenter manages nodes and moves workloads around. In this case withconsolidationPolicyset toWhenEmptyOrUnderutilized, Karpenter will try to reduce cluster cost by removing or replacing nodes if they are underutilized or empty. TheconsolidateAfterspecifies the amount of time Karpenter waits after identifying consolidation opportunities before acting on them.
Review the Karpenter NodePool documentation for more information.
Add the NodeClass and NodePool to the cluster:
kubectl apply -f default-nodeclass.yaml
kubectl apply -f default-nodepool.yaml
Demo: See Karpenter add nodes due to load on a function
Deploy an OpenFaaS function with OpenFaaS autoscaling labels. We are going to invoke the function with a load generation tool called hey, so that the OpenFaaS autoscaler observes the load, and adds more replicas. The higher replica count will not fit within our cluster resources and we should see Karpenter provision an additional node to run the new replicas. After the function scales down again the node will get removed.
faas-cli store deploy sleep \
  --label com.openfaas.scale.max=5 \
  --label com.openfaas.scale.target=5 \
  --label com.openfaas.scale.type=capacity \
  --label com.openfaas.scale.target-proportion=1.0 \
  --cpu-request=1
Note that we set a high cpu request value on the function. This will increase the resources requested and trigger Karpenter to provision a new node when the function is scaled up by the autoscaler.
Run the following command before you start to invoke the function to observe what is happening.
Watch function Pods in one terminal:
kubectl get pods -n openfaas-fn -o wide -w
Watch nodes in a second terminal:
kubectl get nodes -w
Watch the logs for the Karpenter controller in a third terminal:
kubectl logs -f -n "${KARPENTER_NAMESPACE}" -l app.kubernetes.io/name=karpenter -c controller
You can download hey with arkade get hey, or by building it from source using Go. We recommend you use the binaries we built and provide via arkade.
Invoke the function with hey to trigger autoscaling:
hey -t 120 -z 3m -c 25 \
  http://127.0.0.1:8080/function/sleep
The parameters used in the hey command are:
-t 120- Use a 120s timeout for any requests just in case there are any nodes that need to be added and a longer cold start is required-z 3m- Run the test for 3 minutes, note the duration is expressed as a Go duration string with a suffix i.e.sorm-c 25- Use 25 concurrent connections to generate load
After the function is scaled down the node should be reclaimed.
eks-node-viewer showing a
c6a.largenode gets replaced with a biggerc6a.2xlargeinstance to satisfy the resource requests when the sleep function is scaled up to 5 replicas. Thec6a.2xlargeinstance is replaced by a cheaperc6a.largeinstance again after the function has scaled back down to 1 replica.
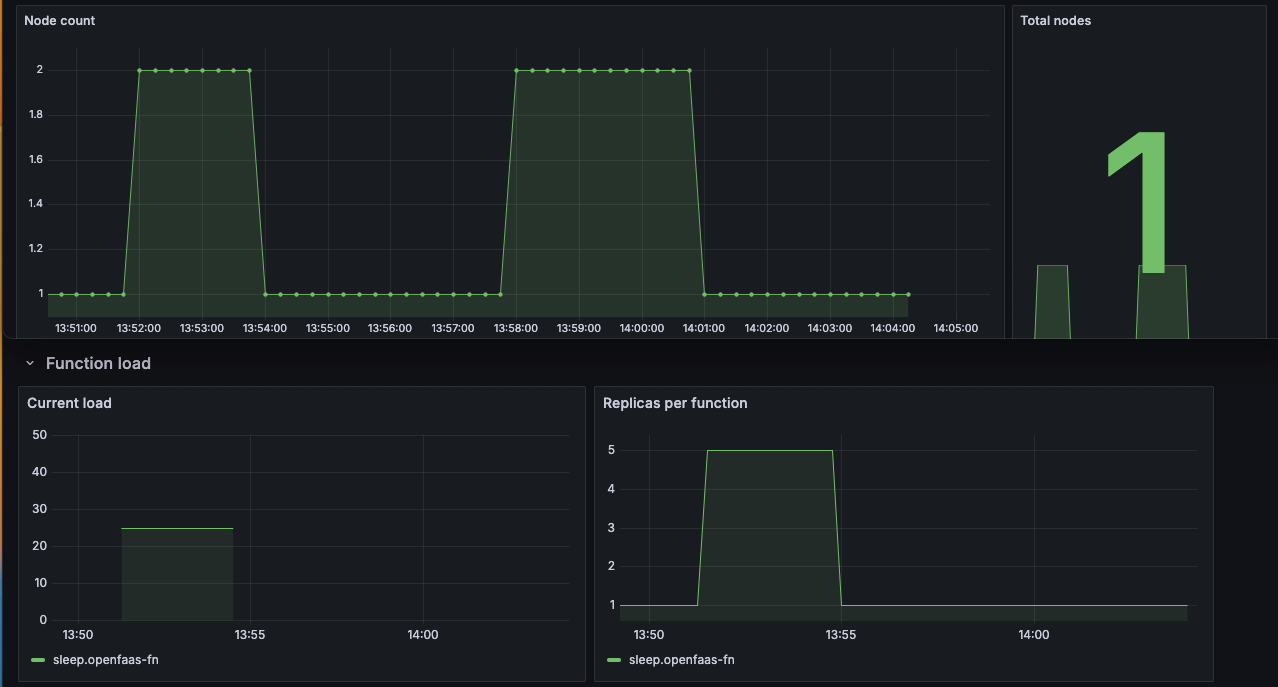
OpenFaaS dashboard showing the replicas of the sleep function alongside the Karpenter dashboard where you can see a node gets replaced by a higher capacity node when the function scales up. The node is replaced with a low capacity node again after the function scales down.
Demo: Advanced scheduling with affinity and OpenFaaS Profiles
Karpenter makes scheduling and provisioning decisions based on attributes such as resource requests, affinity, tolerations, nodeSelector and topology spread. Only the configuration of resource requests is supported through the OpenFaaS function spec. To set any of the other configuration attributes OpenFaaS has the concept of Profiles.
Profiles allow for advanced configuration of function deployments on Kubernetes and allow you to easily apply the configuration to multiple functions. Profiles can be used to configure tolerations, nodeAffinity, etc. See: the OpenFaaS profiles docs for all configuration options.
All profiles need to be created in the openfaas namespace, and are generally managed by cluster administrators. They can then be selected by a function by adding the com.openfaas.profile annotation with the name of the Profile to the function. Multiple profiles are supported with a comma separated list.
To get Karpenter to schedule functions to the default NodePool we need to set NodeAffinity on the function Pods for the functions NodePool.
Create a functions Profile that has a nodeAffinity rule to constrain function Pods to the default NodePool:
cat > functions-profile.yaml <<EOF
kind: Profile
apiVersion: openfaas.com/v1
metadata:
  name: functions
  namespace: openfaas
spec:
  affinity:
    nodeAffinity:
      requiredDuringSchedulingIgnoredDuringExecution:
        nodeSelectorTerms:
          - matchExpressions:
            - key: karpenter.sh/nodepool
              operator: In
              values:
              - default
EOF
Apply the Profile in the OpenFaaS namespace:
kubectl apply -f functions-profile.yaml
Deploy a function from the OpenFaaS store and apply the functions profile.
faas-cli store deploy nodeinfo --annotation "com.openfaas.profile=functions"
After deploying the function Karpenter will try to schedule it to a node in the default NodePool. If there are no nodes or there is not enough capacity in the NodePool to deploy the function, Karpenter will add an extra node or replace the node with a higher capacity one.
Demo: Schedule functions to spot instances with a Profile
If one or more of your functions can tolerate being interrupted or cancelled due to a node being reclaimed, then you could consider using spot instances. Spot instances are available up to a 90% off compared to On-Demand pricing. If you have a mixed workload of functions that can tolerate interruptions and functions that can not we recommend creating a separate NodePool for functions that can use spot nodes.
Create a spot NodePool:
cat > spot-nodepool.yaml <<EOF
apiVersion: karpenter.sh/v1
kind: NodePool
metadata:
  name: spot
  annotations:
    kubernetes.io/description: "NodePool for provisioning spot capacity"
spec:
  template:
    spec:
      taints:
        - key: karpenter.sh/capacity-type
          value: "spot"
          effect: NoSchedule
      requirements:
        - key: karpenter.sh/capacity-type
          operator: In
          values: ["spot"]
        - key: kubernetes.io/arch
          operator: In
          values: ["amd64"]
        - key: kubernetes.io/os
          operator: In
          values: ["linux"]
        - key: karpenter.k8s.aws/instance-category
          operator: In
          values: ["c", "m", "r"]
        - key: karpenter.k8s.aws/instance-generation
          operator: Gt
          values: ["2"]
      nodeClassRef:
        group: karpenter.k8s.aws
        kind: EC2NodeClass
        name: default
      expireAfter: 720h # 30 * 24h = 720h
  limits:
    cpu: 100
  disruption:
    consolidationPolicy: WhenEmptyOrUnderutilized
    consolidateAfter: 1m
EOF
kubectl apply -f spot-nodepool.yaml
This NodePool is almost identical to the default pool that was created earlier. Except for two changes. The karpenter.sh/capacity-type requirement was changed to spot and a taint was added. This taint should prevent running any Pods that do not explicitly tolerate it on spot instance nodes.
To run functions on spot nodes a toleration needs to be added to the function deployment. This can be done by creating a spot-functions Profile.
cat > spot-functions-profile.yaml <<EOF
kind: Profile
apiVersion: openfaas.com/v1
metadata:
  name: spot-functions
  namespace: openfaas
spec:
  tolerations:
  - key: "karpenter.sh/capacity-type"
    operator: "Equal"
    value: "spot"
    effect: "NoSchedule"
EOF
kubectl apply -f spot-functions-profile.yaml
This Profile can now be applied to any function that can tolerate interruptions when a spot instance gets reclaimed.
faas-cli store deploy nodeinfo \
  --annotation "com.openfaas.profile=spot-functions"
Demo: Don’t pay for idle - scale both functions and nodes to zero
The OpenFaaS autoscaler can scale idle functions to zero. When scaled to zero, functions do not consume CPU or memory. Functions are automatically scaled back up again upon first use.
Scale to zero can save money because fewer nodes are required in a cluster and the available resources are used more efficiently. When combined with Karpenter cost savings could be even higher. When functions are scaled to zero Karpenter removes underutilized nodes from the cluster or replaces a bigger node with a cheaper smaller one if the capacity is not required.
When all functions using a NodePool are scaled to zero this means Karpenter will remove all nodes until there are requests for the function again bringing down the node cost to 0 while functions are idle.

Conceptual diagram showing how an underutilized node get removed from the cluster by Karpter when the sleep function running on the node gets scaled down to zero replicas by OpenFaaS.
Longer cold starts
The latency between accepting a request for an unavailable function and serving the request is often called a “cold start”. The cold start time for OpenFaaS functions can vary based on your cluster and the size of the function image but is usually not more than a few seconds. When using Karpenter you have to take into account the cold start can be significantly longer if a new node has to be provisioned. During our testing we saw that it took around 45-50 seconds for a function to become ready on on-demand nodes and around 70 seconds for nodes running on spot instances.
Whatever you are using to invoke the function will need to be able to handle these longer start-up times by either setting a higher timeout for request or supporting retries. Alternatively functions can be invoked asynchronously to gracefully handle longer cold starts by retrying functions for you, and decoupling the request and response from the caller.
Functions can generally scale up very quickly if the images are not too large, and you have some left over capacity aka headroom within the cluster. Unfortunately, headroom is currently not supported by Karpenter but there is an issue tracking this feature request. As an alternative you could enure there is always some spare capacity in the static node group running the core components or create an separate EKS Managed Node Group with some nodes to provide this basline capacity.
To learn more about cold-starts and how to minimise them in OpenFaaS, read: Fine-tuning the cold-start in OpenFaaS on the blog.
Clean up after the demo
If you leave the demo running, you will incur charges on AWS, so it’s important to clean up when you no longer want to run the cluster.
Run the following in this order:
helm uninstall openfaas --namespace openfaas

helm uninstall karpenter --namespace "${KARPENTER_NAMESPACE}"

aws cloudformation delete-stack --stack-name "Karpenter-${CLUSTER_NAME}"

aws ec2 describe-launch-templates --filters "Name=tag:karpenter.k8s.aws/cluster,Values=${CLUSTER_NAME}" |
    jq -r ".LaunchTemplates[].LaunchTemplateName" |
    xargs -I{} aws ec2 delete-launch-template --launch-template-name {}

eksctl delete cluster --name "${CLUSTER_NAME}"
Finally, then check for any related resources in the region such as EC2 instances, or LoadBalancers and remove them.
Conclusion
In this blog post, we set out to show you how to save costs on AWS EKS with OpenFaaS and Karpenter. Karpenter also provides a more modern, and dynamic approach to scaling nodes which also supports various types of NodePools, and scaling them to zero, something you don’t get with alternative solutions. We were able to combine the two so you don’t have to pay for idle resources.
We walked though the steps required to deploy OpenFaaS and Karpenter on an EKS cluster that we provisioned using eksctl. If you have an existing cluster, we also shared a link to the Karpenter documentation for migrating from the Kubernetes Cluster Autoscaler.
Then we showed how OpenFaaS and Karptner can be used together in several demos:
- We showed how Karpenter can remove underutilized nodes to save cost by scaling functions to zero.
- Asynchronous invocations can be used to handle invocations in a more reliable way. They can help to handle delays and retries when functions take longer to become ready because a new node has to be provisioned.
- We used OpenFaaS Profiles to configure scheduling constraints for functions using affinity and tolerations. In this post we created two NodePools for on-demand and spot instances which should be a good starting point for most OpenFaaS clusters. Of course there is a lot more to explore like scheduling based on node resources like GPU or high availability for functions using topology spread. See the Karptner documentation for more advanced scheduling techniques.
In a next article we will show you how OpenFaaS and Karpenter can be used to efficiently run functions that need GPU resources by building on the configuration and features discussed in this article, like scale to zero and OpenFaaS Profiles.
Reach out to us if you’d like a demo, or if you have any questions about OpenFaaS on AWS EKS, or OpenFaaS in general.

Han Verstraete
Associate Software Developer, OpenFaaS Ltd

Alex Ellis
Founder of @openfaas.