Switching to Gitea doesn’t mean having to give up your bot automations.
Introduction
Just like with GitHub, Gitea sends webhooks for actions taking place on your install. By connecting these actions with an OpenFaaS function, you can reduce the amount of manual work done to manage your opensource project and spend more time building.
In this post we will walk through building a simple bot to label pull-requests.
Pre-requisites
For the purposes of this guide we’ll create a local virtual machine and install faasd on it, but these instructions can be extended to use TLS on an Digital Ocean Droplet, or even a Raspberry Pi. The tutorial should take you less than 15-30 minutes to try.
- https://www.openfaas.com/blog/faasd-tls-terraform/
- https://blog.alexellis.io/faasd-for-lightweight-serverless/
Create a Virtual Machine
Multipass is a lightweight virtual machine runner, think docker-compose but for ubuntu virtual machines. We’ll use this to get a virtual machine with faasd up and running quickly.
# Install multipass
## On macOS you can install multipass with the brew command
brew install multipass
## or, on Linux, you can install using the snap command
snap install multipass
# For windows, you'll need to use the installer found on multipass.run

# Run a local VM
multipass launch \
  --name faasd

# Verify your VM has been started
multipass info faasd
Connect faas-cli to your faasd install
Now that faasd is up and running, we’ll need to install faasd, and login into the gateway with the faas-cli.
# Connect to VM
multipass exec faasd bash

# Clone
git clone https://github.com/openfaas/faasd.git

# Install faasd
cd faasd
sh hack/install.sh

# Now exit the VM
exit

# Install faas-cli on your host machine
curl -sSLf https://cli.openfaas.com | sh

# Get IP
export VM_IP=$(multipass info faasd | grep IPv4 | awk '{print $2}')
echo "Your IP is: $VM_IP"

# Login into the faasd gateway
export FAAS_PASSWORD=$(multipass exec faasd sudo cat /var/lib/faasd/secrets/basic-auth-password)
export OPENFAAS_URL="http://$VM_IP:8080"
echo $FAAS_PASSWORD | faas-cli login --password-stdin

# Test that faas-cli connects to gateway
faas-cli list
Install Gitea on your Virtual Machine
Next we’ll need to install Gitea it up and running. This example uses the bleeding edge nightly version, but for production use you may wish to use the current stable version of Gitea.
# Connect to your VM as root
multipass exec faasd sudo bash

# Add Gitea configuration
mkdir -p /var/snap/gitea/common/{conf,data}/
cat >/var/snap/gitea/common/conf/app.ini <<EOL
RUN_USER=root
[server]
DOMAIN = $(hostname -I | awk '{print$1}')
DISABLE_SSH=true
[database]
DB_TYPE = sqlite3
PATH = /var/snap/gitea/common/data/gitea.db
[security]
INSTALL_LOCK = true
[oauth2]
ENABLE=false
EOL

# Use snap to install Gitea
snap install gitea

# Create Gitea database
gitea migrate

# Create a Gitea user
export GITEA_PASSWORD="TEMPOPENFAASPASSWORD"
gitea admin create-user --admin --name gitea_admin --password $GITEA_PASSWORD --email gitea_admin@example.com

# Exit out of your VM
exit
Optionally install OpenFaaS and Gitea on a Kubernetes Cluster
faasd is great for single node installations, but if you are planning on scaling up to multiple servers you can install OpenFaaS and Gitea on a kubernetes cluster.
# Get arkade, and move it to $PATH
curl -sLS https://get.arkade.dev | sh
sudo mv arkade /usr/local/bin/

# Fetch Kubernetes tools to run locally
arkade get kind

# OpenFaaS CLI
arkade get faas-cli

# Create a cluster - if you already have a kubernetes cluster somewhere you can skip this step
kind create cluster

# Install OpenFaaS
arkade install openfaas

# Install Gitea
arkade install gitea
Next, you’ll need to portforward both Gitea, and OpenFaaS, as well as login into the OpenFaaS gateway with faas-cli
# Forward the OpenFaaS gateway to your machine
kubectl rollout status -n openfaas deploy/gateway
kubectl port-forward -n openfaas svc/gateway 8080:8080 &

# If basic auth is enabled, you can now log into your gateway:
PASSWORD=$(kubectl get secret -n openfaas basic-auth -o jsonpath="{.data.basic-auth-password}" | base64 --decode; echo)
echo -n $PASSWORD | faas-cli login --username admin --password-stdin

# Forward the Gitea application to your machine
kubectl -n default port-forward svc/gitea-http 3000:3000 &
Sign into Gitea and create test repo
Finally after Gitea is installed, we’ll need to verify the installation. To do this we will open up the Gitea interface in the browser and login into it.
In the install step we created an admin user with the username gitea_admin and password TEMPOPENFAASPASSWORD, we will take those and go to the login page at http://$VM_IP:3000/user/login

Once logged in, we will create a git repository so when we need to add webhooks to it later it will be ready. In the top navigation bar we can select the + dropdown, and click the “New Repository” link. When we get to the new repository page we will name the repo test_repo and check the “Initialize Repository” option, just to have an example repository for testing purposes.

Build and deploy the Gitea bot function
For this guide we will be using golang for the Gitea bot, but you can use any language that you are comfortable working with.
OpenFaaS and Gitea are both written in Go. Checkout Alex’s new book Everyday Go for practical tips and hands-on examples to gain experience quickly or to level-up.
To get started, we’ll need to pull the prebuilt OpenFaaS template, and create the skeleton of a function using faas-cli.
# Set to your Docker Hub account or registry address
export OPENFAAS_PREFIX=techknowlogick

faas-cli template store pull golang-http
faas-cli new lgtmbot --lang golang-middleware --prefix $OPENFAAS_PREFIX
Now that the skeleton has been created, we’ll need to start writing the function. The first thing to do is to write the webhook validation code.
package function

import (
    "io/ioutil"
    "net/http"

    scm "github.com/jenkins-x/go-scm/scm"
    giteaWebhook "github.com/jenkins-x/go-scm/scm/driver/gitea"
)

func Handle(w http.ResponseWriter, r *http.Request) {
    webhookService := giteaWebhook.NewWebHookService()
	payload, err := webhookService.Parse(r, getWebhookSecret)
	if err != nil {
		// webhook failed to parse, either due to invalid secret or other reason
		w.WriteHeader(http.StatusBadRequest)
		return
	}

    // ...
}

func getWebhookSecret(scm.Webhook) (string, error) {
    secret, err := getAPISecret("webhook-secret")
	return string(secret), err
}

func getAPISecret(secretName string) (secretBytes []byte, err error) {
	// read from the openfaas secrets folder
	return ioutil.ReadFile("/var/openfaas/secrets/" + secretName)
}
What happens in the above snippet is getAPISecret reads the secret which will be defined by faas-cli shortly, is transformed by getWebhookSecret into the function signature required by Parse, and Parse validates that the webhook signature matches the secret, and returns a parsed struct.
Next, we will take that parsed information and determine which PR is being worked on, and update the labels as needed.
import (
    "strings"
    // ...
    "code.gitea.io/sdk/gitea"
)

func Handle(w http.ResponseWriter, r *http.Request) {
    // ...

    owner := ""
	repo := ""
	index := int64(0)
	// validate that we received a PR Hook
	switch v := payload.(type) {
	case *scm.PullRequestHook:
		owner = v.Repo.Namespace
		repo = v.Repo.Name
		index = int64(v.PullRequest.Number)
	default:
		// unexpected hook passed
		w.WriteHeader(http.StatusBadRequest)
		return
	}
	if index == 0 {
		// unexpected hook passed, PR should have an index
		w.WriteHeader(http.StatusBadRequest)
		return
	}

	// get gitea secrets & setup client
	giteaHost, err := getAPISecret("gitea-host")
	if err != nil {
		// failed to get secret
		w.WriteHeader(http.StatusInternalServerError)
		return
	}
	giteaToken, err := getAPISecret("gitea-token")
	if err != nil {
		// failed to get secret
		w.WriteHeader(http.StatusInternalServerError)
	}
	giteaClient, err := gitea.NewClient(string(giteaHost), gitea.SetToken(string(giteaToken)))
	if err != nil {
		// failed to setup gitea client
		w.WriteHeader(http.StatusInternalServerError)
	}

	// fetch PR and approvals
	pr, _, err := giteaClient.GetPullRequest(owner, repo, index)
	if err != nil {
		// failed to fetch PR
		w.WriteHeader(http.StatusInternalServerError)
		return
	}
	approvals, _, err := giteaClient.ListPullReviews(owner, repo, index, gitea.ListPullReviewsOptions{})
	if err != nil {
		// failed to fetch approvals
		w.WriteHeader(http.StatusInternalServerError)
		return
	}

	// determine which LGTM label should be used
	approvalCount := 0
	for _, approval := range approvals {
		if approval.State == gitea.ReviewStateApproved {
			approvalCount++
		}
	}
	labelNeeded := "lgtm/done"
	switch approvalCount {
	case 0:
		labelNeeded = "lgtm/need 2"
	case 1:
		labelNeeded = "lgtm/need 1"
	}

	// loop thourgh existing labels to determine if an update is needed
	needUpdate := true
	for _, label := range pr.Labels {
		if !strings.HasPrefix(label.Name, "lgtm/") {
			continue
		}
		if label.Name == labelNeeded {
			needUpdate = false
			continue
		}
		// if label starts with "lgtm/" but isn't the correct label
		giteaClient.DeleteIssueLabel(owner, repo, index, label.ID)
	}
	if !needUpdate {
		// no label changes required
		w.WriteHeader(http.StatusOK)
		return
	}

	// if needed label not set, then set it
	// fetch ID of labelNeeded
	giteaLabels, _, err := giteaClient.ListRepoLabels(owner, repo, gitea.ListLabelsOptions{})
	if err != nil {
		// failed to fetch labels
		w.WriteHeader(http.StatusInternalServerError)
		return
	}
	labelID := int64(0)
	for _, label := range giteaLabels {
		if label.Name == labelNeeded {
			labelID = label.ID
		}
	}
	if labelID == 0 {
		// failed to find label, TODO: create label
		w.WriteHeader(http.StatusInternalServerError)
		return
	}
	// set label on PR
	createSlice := []int64{int64(labelID)}
	_, _, err = giteaClient.AddIssueLabels(owner, repo, index, gitea.IssueLabelsOption{createSlice})
	if err != nil {
		// failed to set label
		w.WriteHeader(http.StatusInternalServerError)
		return
	}

	// all fine
	w.WriteHeader(http.StatusOK)
	return
}

// ...
With the function now built, now it is time to deploy the function. First you’ll need to setup the secrets, by defining them in the function yaml, and setting them via faas-cli
    build_args:
      GO111MODULE: on
    secrets:
      - webhook-secret # random string generated by you
      - gitea-host # host of your gitea instance, ex. http://$VM_IP:3000/
      - gitea-token # gitea api token generated from http://$VM_IP:3000/user/settings/applications
faas-cli secret create webhook-secret --from-literal "abc123"
faas-cli secret create gitea-host --from-literal "http://$VM_IP:3000/" # Use IP from setup
faas-cli secret create gitea-token --from-literal "GET FROM GITEA GUI"

faas-cli up -f lgtmbot.yml
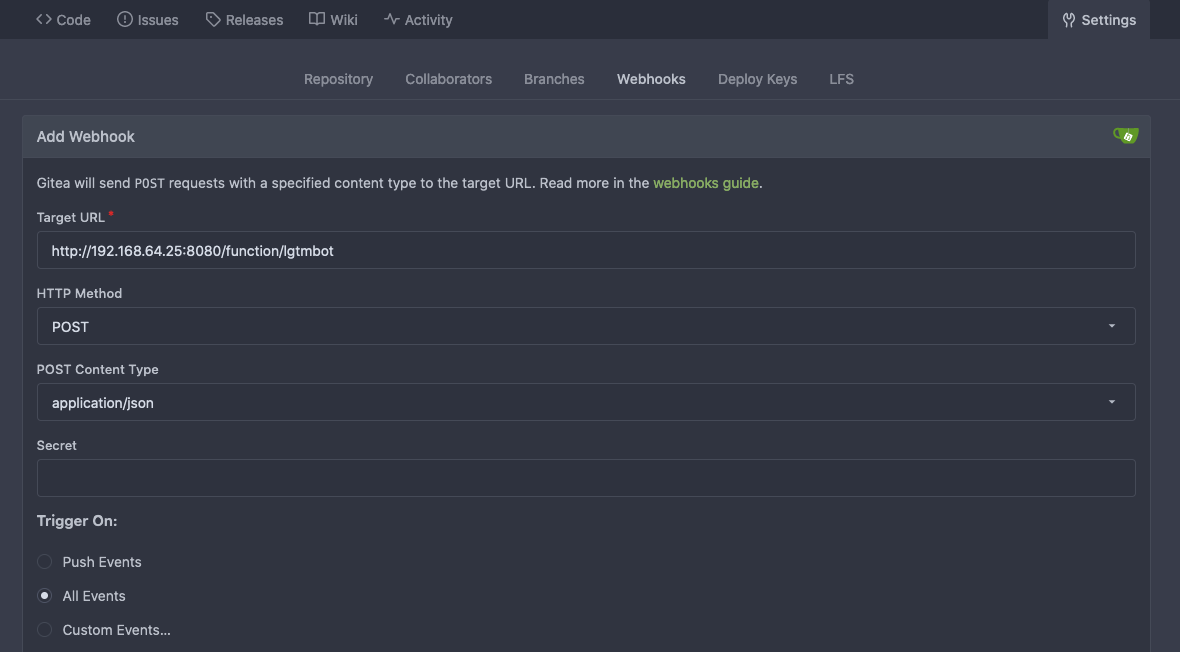
Finally, we need to configure the repo in Gitea that you would like to manage with this function. This can be done by going to the webhooks settings of the repo (ex http://$VM_IP:3000/gitea_admin/test_repo/settings/hooks), and creating a new Gitea webhook with the secret being the one you set above.

Wrapping Up
Now that we’ve seen how to create a simple bot using faasd, from here we can build upon this base and make more complex actions. The next step could be transforming the lockbot from an earlier post to support Gitea as well, or even extending Derek to support Gitea. The possibilities are endless. Eventually we could end up with a number of functions to rival the GitHub apps marketplace.
Taking it further
For a production ready OpenFaaS function that supports automation in Gitea you can view the Gitea/Buildkite connector, or build upon the above LGTMBot function.

